Thursday, November 29, 2012

Great Grandma's Cream Cheese Frosting


Our Great Grandma Kate had an amazing cream cheese frosting. Finger-licking, fighting over who gets to lick the spoon type of frosting.  WWIII over the spoon type of frosting.....okay maybe not that intense, but still its that good.  Plus, we've been able to use it for a bunch of recipes like pumpkin cupcakes (shown above), carrot cakes, red velvet cakes, you name it.  Its super easy to make and with only four ingredients, there's no excuse to not make this cream cheese frosting from scratch.

Here at 2BrokeBakers, we have a personal vendetta with store bought frosting.  Its good when you're low on ingredients or with cake pops, but when possible, go home-made.


Cream together the cream cheese and butter in a large bowl.

Ashley's Tip: It can be difficult if both items are cold, so let them soften by either microwaving them for a few seconds or letting them sit on the counter.

Aubree's Note: I'm notoriously impatient so sometimes I grab the cream cheese (still in package of course) and hold it in my hands for a bit so as to quicken the process with body heat..haha win! 


 The result is this nice fluffy mix.


Add in the teaspoon of vanilla extract. 
And last but not least throw in one package of powdered sugar also known as 16 oz.
Once all mixed together the frosting is ready to go.

This also means you can consume instantly.


The only thing we ask is that someone lick the mixer, the bowl, and the spoon so that none of this delicious frosting goes wasted.

Cinnamon graham crackers also serve as a fine utensil to consume this frosting.


 P.S. If you're wondering that cupcake recipe is shown here its our Pumpkin Cupcakes.


Recipe

8 oz Cream Cheese
1 stick Butter
1 Teaspoon Vanilla Extract
16 oz or 1 package Powdered Sugar

Beat cream cheese and butter until smooth.
Mix in vanilla extract.
Beat in powdered sugar.

Frosts 24 cupcakes or 1 cake.

Enjoy!


Sunday, November 4, 2012

Pumpkin Cupcakes


We're back! We were abducted by martians...

Just kidding! Actually just Aubree was abducted.  She decided to go off to college far away leaving Ashley, who is now working full time and being a slacker part time, to fend for herself on the baking front.  It's been a tough battle thus far, but that ends now! Nothing like the holiday season to get you out of that no-baking blues.  These pumpkin cupcakes with home-made cream cheese frosting are an excellent choice given the time of year.  They taste heavenly, so much so that Ashley wanted to ship one to Aubree (sadly it probably won't survive) and they only cost $5 for 24 cupcakes (that means its 21 cents a cupcake).

                                 Aubree's Note: It also means I'll be demanding 
some when I get back for the holidays!

This recipe was adapted from the book The Frugal Foodie Cookbook which has many different interesting ways to cook on a budget.

It requires oil, pumpkin puree, milk, eggs, cinnamon, ginger, nutmeg, sugar, milk, salt, baking soda, and flour.

 Mix 1/2 cup milk, 2/3 cup oil, 2 eggs beaten and 1 1/3 cup pumpkin puree in a large bowl.


The mess above should become  that on the left.  (looks much more appetizing now!)


In a separate bowl mix 2 cups sugar, 1 1/2 teaspoon baking soda, 1 teaspoon salt, 1/2 teaspoon ground ginger, 1/2 teaspoon ground cinnamon, 1/2 teaspoon ground nutmeg and 2 cups flour.

Once all the dry ingredients have been combined,
slowly add the dry into the wet ingredient mix.

The oven should be preheated to 350F.

Add approx. 1/4 cup mix to every cupcake holder.

Bake for 20 minutes or until thoroughly cooked.

Now comes the guilty pleasure addition: home-made cream cheese frosting.  This part of the baking creation is a family recipe, and we've sure used it during a great number of baking adventures.  So, the recipe is listed below but a more in-depth view of this frosting is here.


Happy Autumn!


Pumpkin Cupcake Recipe

2/3 Cup Vegetable Oil
1/2 Cup Milk
2 Eggs Beaten
1 1/3 Cup Pumpkin Puree
2 Cup Sugar
1 1/2 Teaspoon Baking Soda
1 Teaspoon Salt
1/2 Teaspoon Ground Ginger
1/2 Teaspoon Ground Cinnamon
1/2 Teaspoon Nutmeg
2 Cup Flour

Preheat oven to 350F.
Mix oil, milk, eggs and pumpkin puree in a bowl.  Set aside.
Mix sugar, baking soda, salt, ginger, cinnamon, nutmeg and flour in a bowl.
Fold in dry ingredients into pumpkin mix.
Fill cupcakes 2/3 full.
Bake 20 minutes.

Actually yields 24 cupcakes.


Home-made Cream Cheese Frosting

1 Small package cream cheese
1 Stick butter or margarine
1 Box powdered sugar
1 Teaspoon vanilla extract

(Optional: Add 1/2 teaspoon cinnamon to frosting for a delicious twist!)

Cream together cream cheese and butter.
Mix in sugar and vanilla.
Frost onto cupcakes.

Enjoy!

Wednesday, July 25, 2012

Chicken Salad Sandwich


Tired of that same old peanut butter and jelly, lunch meat, or tuna sandwich? Eating at home is clearly the more cost effective choice these days. Although we wish an In-N-Out burger still cost 25¢, that's just not the case anymore. So we thought we would share a fantastic sandwich that has lots of flavor and more importantly a break from the other sandwiches. Grapes, walnuts and celery spice up this chicken salad sandwich and make it a textured, tasty summer sandwich.

6 ingredients needed: bread, a can of chicken, grapes, celery, walnuts and mayonnaise.

The measurements on this recipe are rough. Go by eye. It really depends how much u want in your sandwich.
Start by draining the chicken and shredding it using a fork. Put in a large bowl.

 Take maybe a cup of grapes, depending on the size of the grapes, and slice them into quarters.


Throw the grapes into the bowl.  We like a lot of grapes in ours, its what gives the mix it's sweet taste.

Next ingredient is the celery.  All that's needed is one stock. Slice into small pieces.  This gives the crunch. It's also healthy so hey, that's always good. 

Once again throw the celery into the bowl and go by sight for how much you want.  If you don't want or like or can't have nuts then we would double the celery to add more crunch.


 Walnuts. Delicious.  All you need is about 1/8 cup, 1/4 cup max.  We didn't buy a large bag from the store to avoid over purchasing.  So we went to Sprouts, and scooped out what we needed from their self serve section.  This way we saved $. yey!
So throw the walnuts in and then add in the mayo.  It only takes about 1 tbsp- 1 1/2 at the most.  Stir and go by eye to see if you need more or less.


The great thing about this sandwich is that it's easy to make in mass production.  Make the Chicken Salad Sandwich on croissants and it looks like the sandwich is from a restaurant.  It's truly a nice alternative to the boring ham and cheese sandwich.

Recipe

1 can chicken breast
1 cup grapes
1 stock celery
1/8 cup walnuts
1 tbsp mayonnaise 

Drain chicken and shred with fork.  Place in large bowl.
Dice grapes and add to bowl.
Slice celery into small pieces and combine with chicken mix.
Chop walnuts and add to bowl.
Add in mayo and stir.
Place on bread and devour. 


Thursday, July 19, 2012

Fresh Raspberry Homemade Ice Cream


In honor of National Ice Cream Month and the fact that's its summer, we decided to share another homemade ice cream recipe.  This one is made from fresh raspberries with some dark chocolate chip chunks.  If you think you've had true raspberry ice cream before, you're wrong.  The fresh berries in this makes it taste so much sweeter and real. It's very similar to our Homemade Vanilla Ice Cream in that it is easy and cheap. We can't go on long enough about how delicious this ice cream will turn out, so you'll just have to experience it for yourself. 

The ingredients are simple for this recipe: sugar, heavy whipping cream, milk, raspberries, a lemon and some chocolate.
Start by throwing 2 cups or 16 oz container of fresh raspberries into a bowl.  Add the juice of 1/2 a lemon and 3/4 cup of sugar.
Thoroughly combine these ingredients and then cover.

Here comes the patient part... refrigerate the raspberry mix for 2 hour and stir every 30 minutes.

Once you've waited for your berries long enough, mix the other ingredients.

In a separate bowl beat 2 eggs until they are light and fluffy.  This took us a couple of minutes.

Next add in 3/4 cup of sugar slowly. After add in 1 cup of milk and 2 cups of heavy whipping cream.


Make sure the cream mixture is thoroughly combined.

Now that your berries have chilled for 2 hours and your cream base is made, add the juice only from the raspberry mix.

Take the remaining raspberries and mash using either a blender, food processor, or hammer.

Aubree's Note: The hammer was a joke, just in case you couldn't tell. (I couldn't the first time...stick with the blender).

If you like your ice cream with chunks of the fruit in it, then don't mash the raspberries too much.  However if you want the smooth texture then blend thoroughly.

After add the raspberries to the cream mixture.

Whisk until blended together well.

Pour ice cream mix into the ice cream maker and begin the process of freezing this stuff.

We made our ice cream at night.  I believe the neighbors hated us.  The ice cream mixer ran for approx. 30 - 40 minutes.  We checked a few times and made sure there was plenty of salt to lower the temperature of the ice. (yes that is actually possible)

Once the ice cream looked almost done throw in some chopped chocolate if you'd like.  Let it run for a few minutes and then pull out the ice cream.

So of course who is actually patient enough to let the ice cream harden after the mixing is finished.  However, placing the ice cream in the freezer is key to making store bought looking ice cream.

Ashley's tip: Let the ice cream sit in the freezer overnight.  This way it won't melt on you in 2 seconds after you scoop it. 


This ice cream sat for 8+ hours before we scooped it.

That's it. Mix some fruit, mix some cream and then use an ice cream maker.  We doubled the recipe and made 4 quarts of ice cream for a total of $7. Yup, good day.
If you're not a fan of raspberries, or you had this and want to try more then all you need to do is switch the fruit out.  Other berries like blackberries, strawberries or boysenberries would be delicious;  Or go for peaches or apricots.  Any of these combinations sound amazing, top with fruit or candy and you're set for summer.


Recipe

2 cups Raspberries
1/2 Lemon
1 1/2 Sugar
2 cups Heavy whipping cream
1 cup Milk
2 Eggs

Combine raspberries, juice from 1/2 a lemon and 3/4 cup sugar in bowl.  Refrigerate for 2 hours and mix every 30 minutes.
Whisk 2 eggs until light and fluffy.  Slowly add in 3/4 cup of sugar continually whisking.  Then combine with milk and heavy whipping cream.
Add in raspberry juice.  Mash raspberries and then mix with cream mixture.
Use ice cream maker and mix for 30-40 minutes or until firm.
Freeze and enjoy.

Makes 2 quarts.


Wednesday, July 11, 2012

Our Favorite Books Cake Pops


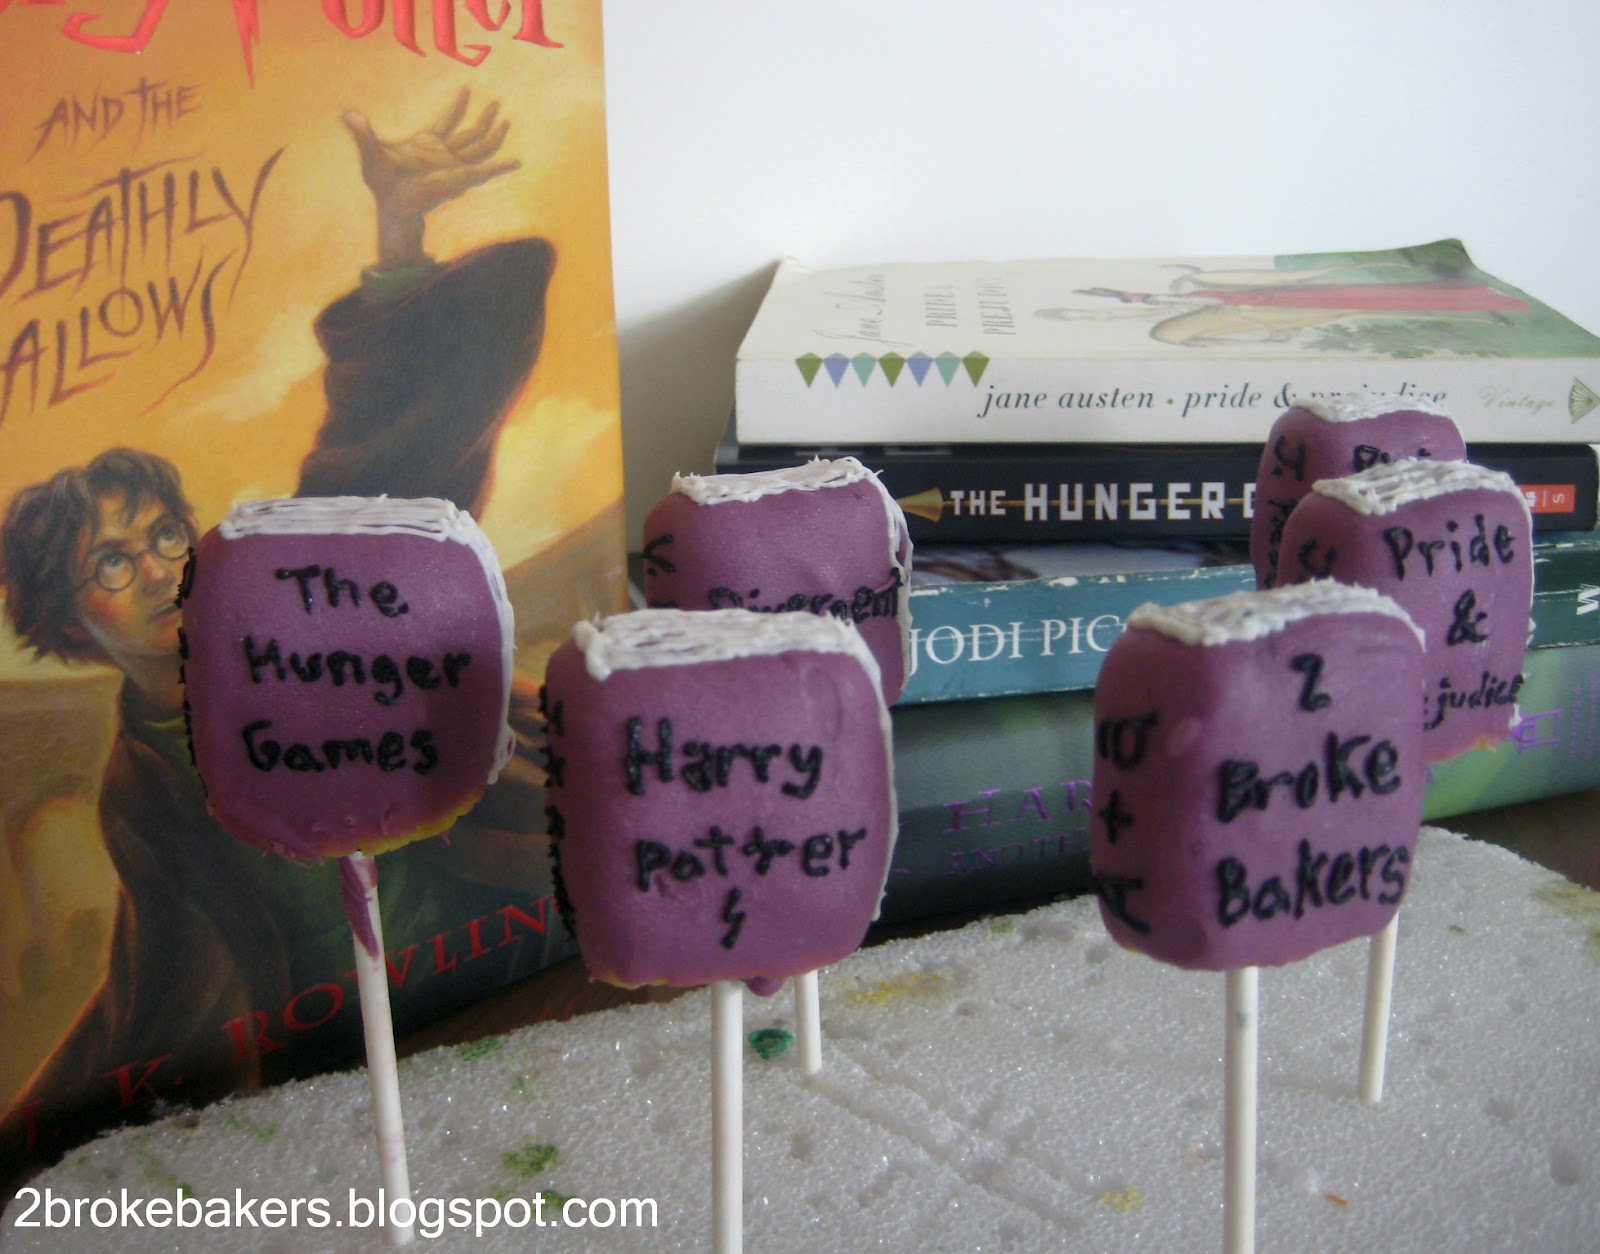
During the summer we read...and read...and read some more.  We're in a constant battle between finding new greats and caving in to re-read those older series that we know and love.  (Case in point: We've probably re-read Harry Potter at least 5 times each). Inspired by this inevitable summer activity, we decided to join our library with our kitchen for a short while and turn our beloved novels into cake pop form.  This way we can get the best of both worlds--baking and reading.  If you haven't seen our other cake pop posts be sure to check out Cake Pops 101,  our greatest hits, and the recipe section to view other cake pops we've made in the past.


Start the process as always with a baked cake.  Lemon cake is the flavor of this cake. We wanted to do something different this time.  It turned out a strong flavor and is a refreshing change from our preferred chocolate and chocolate frosting combo.

If you have a conversation with us it will be pretty clear that we have different opinions for many things.  However we are unanimous in our decision to have Aubree shape the cake pops... every single time.

Aubree wanted to share this trick to make the shape: use a knife to help make crisp lines.  Instead of relying on your hands use a knife to ensure a good shape.

These cake pops were a disaster zone to make.  Be careful of the shape you create.  We had to reshape every single cake pop because the shape was too long and thin.  Yup, fun times (please hear sarcasm).  That meant we shaped, chilled and then reshaped and re-chilled every single cake pop before we dipped them.  


Clearly this batch of cake pops wanted to be a problem because we also had issues with the chocolate.

Here is our story. Once upon a time we decided to buy molding chocolate while it was on sale.  That was months ago.  Now when we went to make some, the chocolate did not melt in the right way.  After realizing this and being frustrated we put the cake pops in the refrigerator and waited to go buy new chocolate.

The moral of this story... only use newer chocolate.  Old chocolate will make dipping the cake pops a nightmare.  


So on to the fun part.  After you've dipped them put some of the left over vanilla frosting into a ziplock bag.  Aubree has become a genius with this stuff.  To make the pages take a small tip and carefully make lines across the top and one of the sides.  This creates the pages.

Aubree's Note: Its impossible to make the lines straight and perfect like a book.  After 2 seconds I realized that even with all my OCD, its gonna look messy (more like an old, crinkled book).

Also more fun times while this happened because we could not shake the table.  lol we survived.


The type of icing that you use on the cake pops is also important. The gel type of the left does not harden. So the work you do will smear.... stay away.  We use the icing on the right to write the book titles and authors on the binding.

Harry Potter & Divergent Cake Pops
Made-up titles, just as cool as the classics. 


Pride & Prejudice Cake Pops


Here is our moment to "lightly" mention the reasons why we chose these specific books for this batch of book cake pops.  To say it lightly, WE LOVE THESE NOVELS.  When given a chance to show our love for Jane Austen, J.K. Rowling, and Jodi Picoult, we absolutely could not resist! Just Saying...and some of our recent discoveries like The Hunger Games and Divergent must be added too (just because). When in doubt, go read Harry Potter :)
Oh, and stay away from old chocolate.